Coppermine Stats
Photo Albums
• Albums: 308
• Pictures: 2452 · Views: 824590 · Votes: 1316
· Comments: 86
|
| Skinning and gutting rabbits - My way |
 http://youtu.be/lfDyQfkU7cQ http://youtu.be/lfDyQfkU7cQ
A quick movie (about 2 minutes) on how I prepare rabbits I harvested.
Steps:
1. cut off the head
2. cut off the legs
3. score a small cut roughly in the middle of the back
4. peel skin from body
5. flip body belly up
6. score the belly flesh (no need to cut through)
7. make a small puncture on the belly enough for your finger.
8. with finger, open the belly on the scored line (step 6)
9. flick out the innards
10. open the chest cavity and remove lungs
11. open the pelvis and remove anus and bung.
All above should be do able within about 45 to 60 seconds once you get the hang of it.
Happy hunting.
|
Posted by gelandangan on Wednesday, June 12, 2013 (16:15:07) (1972 reads)
comments? |   | Score: 2 | Score: 2 |
| Study Says CWD Spread Through Blood, Saliva |
Study Says CWD Spread Through Blood, Saliva
FORT COLLINS, CO—Researchers at Colorado State University released the results of a new study last week they say identifies blood and saliva as the carries of the proteins that cause the spread of chronic wasting disease (CWD) among deer and other ungulates.
The study results appear in the journal Science, and indicate that CWD might spread from animal to animal through mosquitoes and ticks, as well as when animals groom and lick each other.
“This might explain why the disease transfers so quickly,” said Colorado State University Professor Dr. Ed Hoover.
Hoover led the study in which saliva was taken from wild Colorado deer known to have CWD and placed into the mouths of three healthy domestic deer at a Colorado State University research center. Hoover says the domesticated test animals all became infected with CWD. Hoover says another deer that was given a single transfusion of CWD-infected blood also became infected with the disease.
Because blood is found in virtually all organs and tissues of deer and other ungulates, Hoover says he recommends that all elk and deer killed by hunters in known CWD areas be tested for the disease before being consumed.
To date, there continues to be no known cases of CWD being transferred to humans.
|
Posted by rrogacki on Saturday, October 14, 2006 (16:16:33) (6773 reads)
comments? | | Score: 5 |
| Caping Guide |
This guide is graphic so if you find the sight of blood is disturbing, click the back button on your browser now. It is also image intensive so it might take some time to load on slower internet connections.
First off congratulations on your harvest! Getting a animal mounted is an exciting thing to me... it is much better than pictures and a great way to remember the hunt and harvest.
This guide is meant to be an overview of how to cape out a big game animal for a classic shoulder mount. It is pretty much the same for any big game animal but you might want to consult with your local taxidermist before taking to the field to see if he has any specific additional instructions.
Hint!
Before you even think about dressing out the animal and caping it, take a moment and study it in its natural form. Turn the head to the left, to the right... raise it higher and lower. Try to get a feel for the best "look" as that will aid you later when the taxidermist asks you what form you want to have it mounted on. Defects can be hidden or enhanced depending on the head position and there is no better time to figure this out than before you begin processing it in the field.
It might also be a good idea to visit a taxidermy form supplier's website to see what types of forms are available for the animal you are hunting, so you at least have an idea what is available. Common forms include Alert (head raised), sneak (head low), semi-sneak (head midlevel), and turns, Ahead, Left, Right. etc etc.
Step #1) Preparation
Try through the steps, to avoid getting blood on the cape. Some people wash off their animals which can be good or bad depending on the animal and what type of hair it has. The following pictures are of a Wyoming Pronghorn Antelope and they are notorious for having hair "slippage" so I like to touch it as little as possible and let the taxidermist do any cleaning of blood as he sees fit.
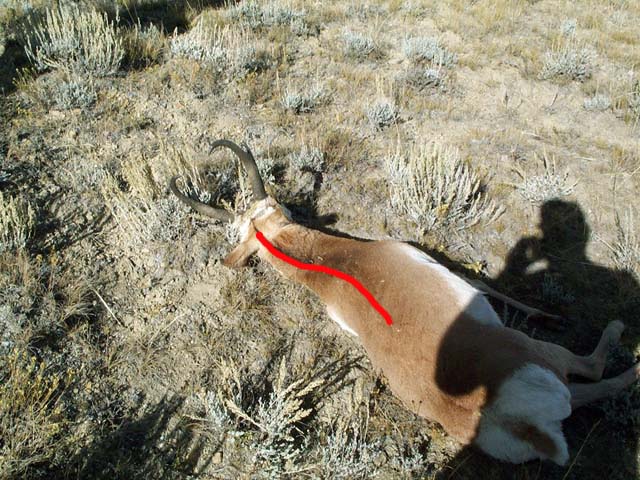
For a traditional wall mount, the cape is split right up the back of the neck and down around both sides of the chest (see red lines on following pictures).
One major problem most novice hunters make is they make their chest cuts too far forward. Trust me, take more hide rather than too little. Your taxidermist will be much happier if he cuts off an extra 10" than going to mount it and finding out hes 2" short on the brisket.
Mentally envision the first cut, down the center of the animals neck:

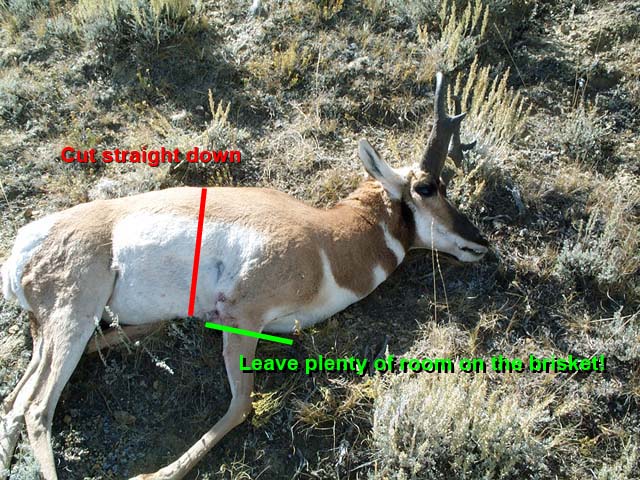
Mentally envision the side cuts, making note to start far enough back.

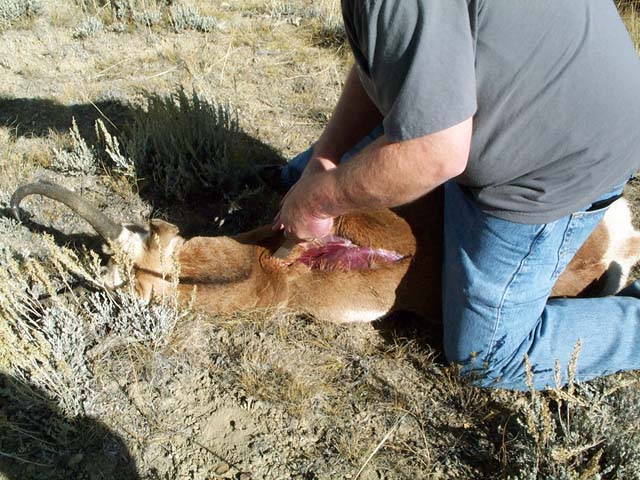
Step #2) Cutting down the neck
Feel with your fingers the backbone and insert your knife to make the initial hole. I dont cut too deep at this point because I want to extract the tenderloins later. I insert two fingers into the hole with my knife safely between them. I then keep constant pulling pressure on the hide as I work the knife carefully up and down making the cut. I like to angle the tip of the knife forward so the hide is cut from the inside out rather than outside edge in. This helps cutting hairs that then get all over the place.

Carefully work your way up the neck to the base of the skull.


Step #3) Cutting down the side
Again, take a good look and make sure you are starting far enough back to give your taxidermist enough hide to work with (note my brother who is a taxidermist looked at this picture and still felt i was on the edge... he'd rather the cut be another 6" back).

Cut the hide straight down the animal (be careful you dont accidently angle forward) exposing the front shoulder.

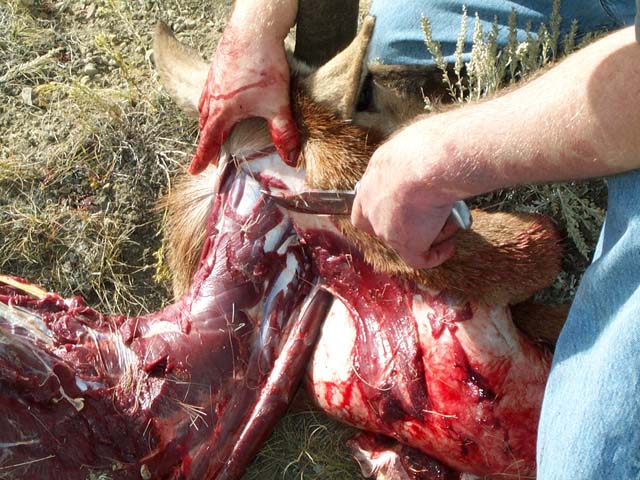
Insert the knife at the back of the front leg and cut upwards along it, angling into the "armpit" and back until you reach the previous side cut.

Next skin around the front leg, freeing it from leg and "armpit" area.


The entire front shoulder should be completely free at this point. This is a great time to remove it via the "gutless skinning method" listed in another HuntingNut article!

Step #4) Processing side 2
Turn the animal over carefully and again, double check where you are going to make the side cut.

Cut straight down the side to where the first side cut ended at the brisket, exposing the shoulder.

Insert the knife in the back of the front leg, cutting upwards towards the "armpit" then back to your side cut.

Skin around the front leg. Finish freeing up any attached hide near the belly area.


Carefully pull on the hide at this point and make small cuts freeing it from the neck and brisket area.

Once you have it free up to the base of the skull, carefully cut through the meat, jugular, windpipe and tendons at the base of the skull. Once this is done you can carefully twist off the head (it should come off with no problem).
Your head and cape should be free from the body at this point.

Spread the cape out while you process the rest of the animal to let it cool down (very important for some species of big game like Antelope)

Step #5) Processing the head
Processing the head may or may not be necessary depending on how long it will take you to get to a taxidermist. If the weather is cold or you have a way to freeze it you can do that and let the taxidermist do the skinning of the head.
I really suggest your taxidermist do this as you can really mess up cape if you cut the lips, eyes or nose wrong. Its not terribly hard however and I will walk through the steps of it. You might want to try skinning out some small game animals or even big game animals you dont intend on mounting to get a feel for how this works.
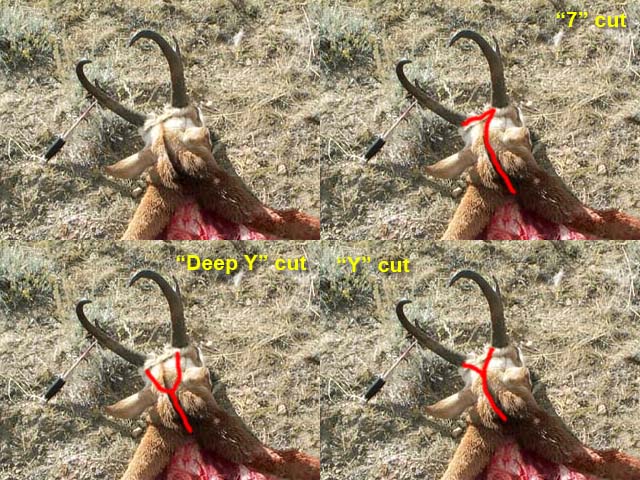
First start by orienting the head somewhere it will be secure and easy to work on. Continue the back of the neck cut
Next decide on what type of cut you want to make to free it from the antlers (for a female or animal without antlers you dont have to cut a "Y" cut but rather split the neck just enough to slip the cape up over the head). There are several variations on this and I suggest you ask your taxidermist what he recommends. I personally like the "deep y" as it tends to hide the stitching in the folds of the ears. I have an antelope mounted with a normal "Y" and you can see the stitching on the top of the head. Ask your taxidermist what he recommends.
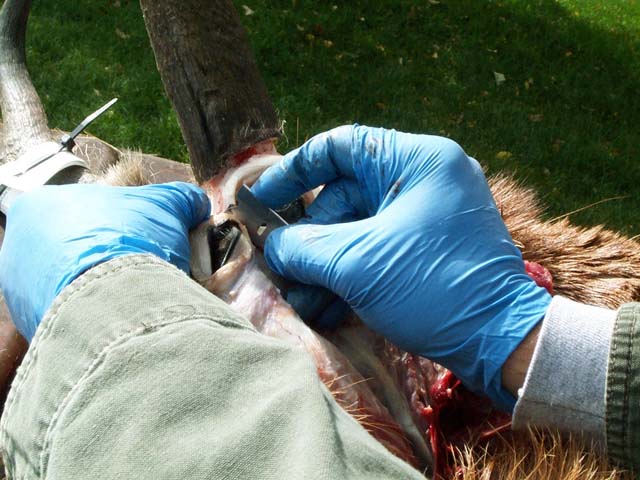
Next begin carefully skinning the cape from the head. Wiggle the ears to get an idea of where the cartlidge connects to the skull. Cut through it as close to the skull as possible.
NOTE: this is a poor picture but the head is upside down resting on its horns and nose. You can see on the left side where the ear cartlidge has been cut free.

Carefully cut around the base of each antler / horn, freeing the hide. Work in slow careful strokes until you come to the eyes.

Ok if you are tired at this point take a break. The eyes are next and can be tricky for your first time. Now is when patience pays off. Pull on the eye lids and feel with your fingers where the skin around the eye attaches to the skull. You want to cut this as close as possible to the skull. It should be nearly pure white skin that you are cutting. You should be able to see your knife blade behind the skin if you look down under the eyeball. Verify several times you arent cutting any visible "outside" skin. This is expecially important when you get to the inside corner of the eye where the tear duct is. Cut deeply into the skull to remove as much of the duct as possible.
Cut deep, inside the eye socket bone, freeing as much tissue as you can. Your taxidermist will cut off anything he doesnt need but like with a brisket if you are short here, it will be difficult for him to fix.


Once that tedious step is done, orient the animal so you can begin freeing up the lips. Pull the lower lip with a steady pressure and cut it free from the inside of the lip where it meets the gums.

Next pull upward on the upper lip and cut through the gum material and upwards through the nose. It should slowly unfold as you work it free.
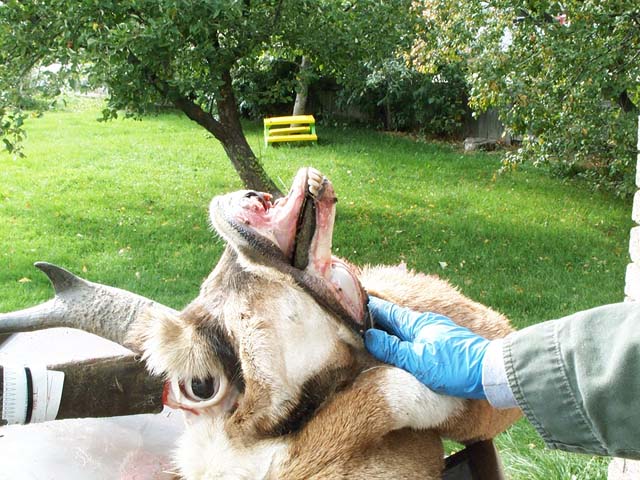
Once you have freed the lips and nose, re-orient the head and finish skinning down the sides of the cheeks until it comes free.

At this point your cape should be off the head. Carefully cut off any large pieces of meat that might be hanging on to it. If you have immediate access to a freezer roll it up carefully and freeze it. If you dont have access to a freezer put it in a cool shady spot and unroll it so it can begin to air dry. Rub salt onto it to aid in the drying process.
DO NOT SALT AND THEN FREEZE THE HIDE!!! THIS WILL FREEZER BURN IT RUINING MOST HIDES!!! Freeze *OR* salt but not both!

With the cape removed you can now saw the antlers off or if you are going for a european mount you can boil the head right now (antelope need their horn sheaths removed first, email me if you need instructions on ways to do that step).

Thats pretty much it! Take it to your taxidermist and get it mounted then come back here and share some pictures!
|
Posted by DallanC on Saturday, March 25, 2006 (02:41:09) (24339 reads)
comments? | | Score: 4.72 |
| The Gutless Field Dressing Method |
Warning: This article covers graphic content not suitable for children or the squeemish
I learned this method of dressing animals on a Wyoming Pronghorn hunt. Antelope meat is VERY good, but only if you take care of it immediately. This means getting it on ice ASAP! I started quartering the animals with the "gutless" method and getting them on ice. Boy since we started doing this our antelope have never tasted better. I've gotten alot of "woah" and "how did you do that???" from other hunters or landowners when they see me take a critter apart in a couple minutes and deposit all the good eats on ice. Also, who really wants to gut a stinky antelope? LOL not me.
The "gutless" method can be done two ways, either by skinning the legs before removal or skinning them after removal. Personally I usually remove the quarters with the hide on to keep the meat cleaner, then skin each leg out after.
You can start with either the loins, front or rear quarters. There is no right or wrong way to do it. I usually do one sides front, same sides rear, flip the animal followed by the remaining front and finally the remaining rear. Then I cut out the loins and call it good.
For this example I also took pictures of how to cape an animal (for another guide) so the front quarters at least are already skinned. Hide on or hide off the legs, it really doesn't mater for the actual extraction of the quarters.
Lets begin. With the animal on its side, grab a frontleg and lift it up and away from the body. Place your knife into the "armpit" and cut right in the crease, angling slightly towards the ribcage. Cut away the meat, cartilage where it meets the ribcage. There are no bones in the shoulder of deer or elk that attach the front legs to the ribcage, its all held together with muscle and cartilage!

Keep lifting the leg as you continue making cuts as needed to free the leg.

Continue working your way across until the leg comes free from the ribcage. Most of it will cut free very easily, some cartilage can be stubborn but a good sharp knife will get through it.

Once the leg is free take care of it how you wish, either into game bags, coolers, panyards or whatever. You can even debone it now that its free and is actually alot easier to work with (hang it in a tree so you dont have to bend over while working with it).

Depending on the size of the animal I'm dressing, I'll either process an entire side then roll it over and do the other, or you can do the fronts then the rears. The order is largely irrelevant. Here I am continuing with the other front quarter only because for the caping guide I skinned out the other leg and wanted to get it in the cooler as soon as possible, antelope is time critical when it comes to getting the meat cooled quickly. Generally I remove one entire sides quarters before flipping it over.
As with the other front leg, pull up on the leg and cut away the meat and cartilage along the ribcage where it attaches.

Continue carefully until it comes free. Once it does, store as needed.

Thus far it should have been amazingly easy! Those front quarters come off with very little effort. The hinds are slightly more tricky, but they come off nearly as easy!
Be aware that some states require proof of sex remain attached to the hind quarters, if this is the case in your state split the scrotum in half and leave half attached to each hind quarter!!!
Ok lets begin by talking about how to do the hind quarters. These are attached to the pelvis by a hip bone and socket. Inside of the ball and socket is a tendon that must be cut. It isn't terribly hard, but I recommend in doing this for the first time, you just take your time. After doing it once, any future animals will seem easy. Also I really recommend you use your finger or thumb to feel around where the bones are so you don't dull your knife too much. There is also a bone at the top of the pelvis that we need to cut around, it is easily felt with your fingers to identify and then cut around.
Start by having someone lift the leg up off the body, or tie it to a bush / tree to keep tension on it. This frees up both hands and makes things alot easier. You can at this point skin the quarter before removal, or after. I chose to skin it after.
Begin by cutting along side the penis, back towards the rear of the animal.

Take short careful strokes.

Cut the skin towards the front of the hind quarter, and begin cutting the meat downward towards the hip and body. Be careful to keep your knife away from the belly area as we don't want to puncture anything.

Right in the middle of the leg is the leg / hip bone socket. You will be able feel it with your fingers. Moving the leg back and forth will also allow you to identify where this socket is. Cut the meat away around it, exposing the socket itself. With some minor pressure pulling on the leg, the socket will open up allowing you to cut the tendon inside (visibly right at the tip of the knife)

Carefully cut any muscle or cartilage around the ball and the bone should pop free from the socket.

Next identify the pelvic bone that sticks out, it will be easily found by feeling around with your finger. If not continue to cut the muscle away until you do. Here I am pointing to the tip of it with my finger. You will want to cut around this bone to free the rest of the hind quarter.

Here you can clearly see the pelvic bone exposed. Continue to cut the meat away from the hip.

A few more careful slices and the entire quarter comes cleanly off. Process it further how you want.

Flip the animal over and repeat for the other side.
Cut along the penis down until you reach the ball joint. Carefully cut the muscle around the joint until the ball begins to pull out, cut the tendon inside.

Continue to cut the muscle until you reach the pelvic bone, then cut carefully around it.

Continue cutting muscle away from the pelvis until the quarter comes free. Process as needed.

Thats it! Not terribly hard was it? We are not done yet however, the best eating part still needs to be removed, the tenderloins.
Removal of the tenderloin / backstraps. As with the other steps, it can be done at any point but I usually leave it for last.
Begin by cutting the skin enough you can access the tenderloin. Next cut along the spine from the hip up towards the shoulder.

Using your fingers, carefully pull the loin away from the spine, and carefully cut the meat loose in small tiny knife stokes. This isn't a job to rush so take your time. It is hard to get it started, but once you do it comes off quite easily.

Repeat for the other side of the loin.

That's pretty much it! After a couple practice tries you should be able to do a deer or antelope within 10 minutes or so... yes it is that fast. The great thing is if you have a gutshot animal, you have almost zero chance of getting the fluids on your meat.
The downside to this method? Well there actually is one... the Fillet Minion. It is located inside the body cavity opposite the tender loins. For small animals like antelope I don't feel its worth the effort to remove. For deer I always remove it as its my most favorite cut of meat. For Elk its not even a question, I'd rather have that cut than any other.
You can extract it either by traditional field dressing or you can remove it actually after doing the gutless method but its fairly tricky. I do not have pictures of how to do this but you position the animal on its belly with the back in the air. Cut along the spine from where the last rib ends back towards the pelvis. Be very careful you dont puncture the internals. You can then reach up in the hole and cut free the Filet. Repeat for the Filet on the other side. I'll be blunt, this is tricky stuff. You better have a good idea of what the Fillet Minion is, how its attached and how to cut it free. This is good knowledge to have but best learned by removing it from traditionally field dressed animals.
***Disclaimer: Since I released this guide I've recieved several points of critism, thats perfectly fine, everyone has an opinion. A few points are well justified and worth bringing up.
1) Keep as much hair as possible off the meat. Sounds like a no brainer but in reality things are not so simple. The day this antelope was shot it was incredibly windy, gusting up to 35mph. Antelope hair is extremely brittle and dislodges easily, add in some high winds and thats why you see hair on the meat. I was able to wash off these quarters about 30 minutes later when we got back to the ranch house. Hopefully you dress your animals in better conditions.
2) If you touch the animal anywhere with a hand, do not touch the meat. Again this is a means to reduce contamination. Wearing several sets of laytex gloves would help when you need to transition from touching the leg to touching meat.
3) Proof of sex. Some states require proof of sex remain attached to the meat. This is easily done by splitting the scrotum in half and leaving it attached to each hind.
4) Knife cuts. If you cut from under the skin to the surface, you will cut less hair and have less problems with hair getting on the meat as well as making it easier for a taxidermist to hide the cut marks.
Good tips, thanks for those who suggested them!
Copyright 2005, HuntingNut.com
|
Posted by DallanC on Tuesday, October 18, 2005 (02:58:04) (80272 reads)
comments? | | Score: 4.77 |
| Field Dressing Guide |
Field dressing a deer is fairly simple and there are a few different ways out there to do it. I won't presume to tell you the following is the best way to do it, but this is a very easy and fast method which was taught by me by my father. On average it only takes about 10 minutes to field dress a deer and requires only a sharp pocket knife.
Note: Some field dressing methods start off with the cutting of the animals throat and windpipe. I have NEVER understood why this is. It not only looks very bad to people who may see the animal as you bring it home, it really serves no other purpose (other than having your taxidermist chew you out for nearly ruining the cape). The only way severing the jugular arteries would be of use is if the animal was still alive with it's heart pumping. If the animal is dead you can only drain out the small amount of blood in that localized region of the throat... hardly worth worring about as we will be severing this artery just below where it enters the body cavity. If you feel you absolutely MUST cut the throat, poke your knife into the neck and cut BELOW the skin to sever what you want.
Warning: The following pages contain actual pictures of field dressing a deer. If you do not wish to view such pictures click HERE to return to the main page.
Step #1) Orienting the Animal
Now then, first start by orienting the animal on it's back with the head uphill. Have someone help hold the rear legs spread apart or tie each leg to some brush to hold apart.
On the inside of each rear leg by the "knee" will be a dark patch of hair marking the tarsil glands.
It is a good idea to remove these glands, do so by cutting the skin around the gland area...
be very careful to cut well around the gland and not get anything on your knife or hands. A knife
contaminated by the glands will affect any meat it comes in contact with.

Step #2) Detaching the Testicles
Next take hold of the testicles and cut them off with your knife.
Warning: Some states require "proof of sex" to be attached to the animal. Antlers are a sure sign of an animals sex. If you are removing the head from the animals body, you must leave the scrotum attached to the body. To do so, Make an incision along the scrotum and squeeze out each testicle and cut it off.

Step #3) Detaching the Penis
Grab the penis and pull slightly away from the body, begin severing the penis from the body, working from the tip down around towards the anus. It should seperate fairly easily from the belly.


Once you have seperated the penis from the belly, cut the skin along side the penis the remainder of the way, stopping short of the anus. Keep pulling lightly on the penis and cut it free with your knife on each side of the thighs.


Step #4) Detaching the Anus
Once the penis is free from the outside of the pelvic region you will then need to cut around the anus itself. Give yourself some room to work by not cutting too close to the anus. Once the skin around the anus has been cut free, lay the penis backwards over the anus and very carefully cut the penis free from the inside of the pelvis area. It sometimes helps to pull the penis slightly down and out while cutting it loose. If done correctly, the penis
and anus will now be together, loose from the body and pelvic region. Be careful when inserting your knife too far as you may nick the bladder.


Step #5) Opening the Body Cavity
Now begin to open the body cavity down the centerline of the animal, between the ribs and pelvis. Be very very careful while making the initial incision that you do not puncture the stomach or intestines. Take very light strokes until you get through the stomach skin. Insert two fingers into the new hole to seperate the stomach and intestines from the outer skin by pulling outward on the skin. Slide your knife between your fingers, blade facing down but horizonal with the skin. This will allow you to cut the stomach skin without puncturing the internal organs as you pull up on it. Cut the skin from the pelvis up to the brisket.

Note: Some field dressing methods split the entire ribcage at this point to gain easier access to the lungs/windpipe. I do not like this for 3 reasons, #1) if you plan to mount the animal, cutting the cape in the brisket area will result in a noticeable line when the animal is sewn up. You *will* get chewed out by your taxidermist, plan on it! #2) it allows more dirt and debris to enter the animal. #3) Not splitting the ribcage is much faster

To give yourself more room for future steps, cut off the belly skin, following the ribs down around each side of the deer to the pelvis, it should be easy due to the initial incision down the center.


Step #6) Freeing the Diaphram
You should now be able to see the greenish bag of the stomach as well as intestines. In between the stomach and the lungs, will be a layer of muscle known as the diaphram. If you insert your hand at the top of the incision you just made near the ribs, you will be able to feel the diaphram. Carefully pull the stomach
slightly away from the diaphram and begin cutting it away from the ribcage wall. This must be done all the way around the ribcage (usually it will just tear free easily except where it connects to the backbone of the animal). At this point most of the stomache and intestines should "roll" out beside the animal.

Picture showing incision in Diaphram. Continue around both sides

With the diaphram cut free, you should be able to look into the chest cavity and see the lungs.

Step #7) Severing Windpipe/Esophagus
We are almost done at this point! The only thing left to do is to sever the windpipe and esophagus. Reach up into the ribcage as far as you can, feeling for the semi-hard windpipe. It is easy to feel where both the windpipe and esophagus leave the ribcage, running up into the neck area. Cut the windpipe/esophagus off at this point. (no picture available sorry!)
Pull on the severed windpipe and the lungs/heart/liver etc should easily come out and be rolled along side the animal.

Step #8) Removal of Penis / Anus
Take ahold of the lower intestine/colon where it passes into the pelvic canal. Carefully pull on the colon, if the penis/anus has been correctly cut free in Step #4 it should pull through the pelvic canal easily.
If it does not pull free easily, examine where it is still attached and cut it free. It must still be attached near the anus, *NOT* near the bladder! WARNING! Be extremely careful of the bladder! Take care not to pucture it.


Step #9) Final Care
Lift the animal by the head to allow and remaining blood in the chest cavity to drain.

If you have clean water available wash out the chest cavity and any exposed meat.

Keep the animal cool until you can deliver the animal, as soon as possible to a butcher. If you are going to cut up the animal yourself and choose to "age" it in a cool place, hang the animal by the rear legs to allow any excess fluids to drain AWAY from the hind quarters.

That's it! With practice, you can field dress your deer in a very short amount of time. On average I can field dress a deer within 5-10 minutes.
The best advice I can give is to study the pictures until you are familiar with the anatomy of a deer, then when in the field just take your time. The first time will be the toughest but after field dressing that first deer, you'll become a pro in a very short amount of time.
Special Thanks to my wife Heather who shot this buck while pregnant and helping me create this FAQ by taking pictures, she gave birth to our son only a few days later!
|
Posted by DallanC on Tuesday, May 10, 2005 (23:17:58) (109919 reads)
comments? | | Score: 4.78 |
|
 Latest: IPutMoInYoA
 New Today: 0
 New Yesterday: 0
 Overall: 13131
 People Online:
 Members: 0
 Visitors: 256
 Total: 257
 Visitors:
 BOT:
BOT: