Coppermine Stats
Photo Albums
• Albums: 308
• Pictures: 2452 · Views: 824013 · Votes: 1316
· Comments: 86
|
| Creating a Custom User Photo Album |

Here at HuntingNut we have a large selection of categories for people to upload pictures into. However there are times when users may want to have a special place for their own pictures and images. This is easily supported.
Registered users can create custom albums that only they can upload pictures into, and manage. This is useful to organize pictures by Hunt, Year, species etc etc.
Step 1: Enter the Photo Albums

Step 2: Select the Album Management section by clicking the "Create / Order my Albums" link.

Step 3: Enter a name for your new album

Step 4: Thats it! When you choose to upload a picture, your new album will appear in the Albums list at the bottom. User Album Names are prefaced with a "*" character.
Only the user that created an album can upload pictures into it. The owner of the album can delete pictures, delete or edit his own albums etc etc. These will only be visible by other users.

Thats it! Very simple, very easy to manage. Play with it and let us know if you have any additional questions.
|
Posted by JohnnyDoe on Saturday, December 02, 2006 (01:23:35) (17842 reads)
comments? |   | Score: 5 | Score: 5 |
| How to Post a Picture in a Message |
The ability to post images in message is very fun. It can help tell a story, show off a successful hunt as well as be able to convey details not possible through plain text. It can be confusing to new people but in reality, posting pictures is very easy. Be careful posting images that do not belong to you however.
To post an Picture in a message, it must first exist on the internet somewhere. Physical computers that hold the images are called "Hosts". HuntingNut.com is a free image host for hunting, fishing and other related pictures. Some people choose to have their pictures hosted on personal webhosts, paying a monthly fee or choosing any one of the free hosts that exist.
To upload an image to be hosted on HuntingNut.com, see our Hosting Pictures, a Quick Guide
Once the picture is hosted somewhere, it will have an address called an "URL". Url stands for "Uniform Resource Locator" which is a fancy way of saying its an internet address. You can right click most pictures that appear in a web-browser and get Properties and see the URL of the picture. That is its physical address that is used by the browser to get and display the image. The URL of an image is also called a "Link". Posting the address to an image in a message is called "linking" the picture.
From here I will assume the picture you wish to post in a message has been successfully uploaded to HuntingNut. Lets continue.
Step 1: Enter the Photo Albums

Step 2: Select the Category containing the picture

Step 3: Select the Album containing the picture

Step 4: Select the Picture you wish to link to

Step 5: Scroll down to the Picture Information section
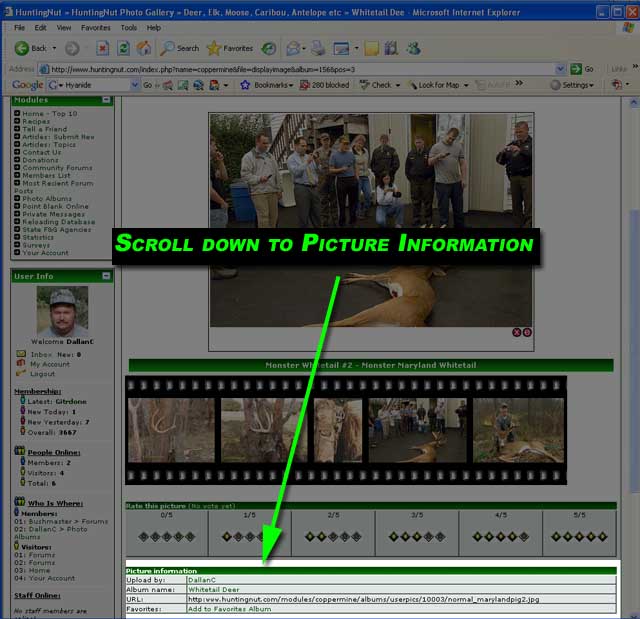
Step 6: With your mouse, drag and select the Pictures URL. Copy this url

Step 7: The url or link address to the image should now be in the windows copy buffer. You can now paste this inside of the message you wish to post the image in.
Posting the link however is not enough in most forum softwares. You need to give it a command that tells the website to display the picture itself, and not display the url only. This is done by using two special commands: [img] and [/img]. Note the 2nd command has a "/" within it.
When you post a message to a forum, the software quickly looks through the message for any codes and handles them specially. Bolding, italics, font size changes or font colors are all processed at this point. This includes linked images.
When the software encounters a [img] command it then reads all of the text until it reaches a [/img] at which point it stops. It then takes the text it read between the two commands and uses it as a picture image to display.
To recap, in order to get an image to display in a post it needs a
[img] command before the URL, the URL itself pointing to the image we wish to display, and a ending command of [/img]. Thats it! Very easy!

Step 8: With the image properly added to a post, click the Preview button of the post and see if it displays. If everything was linked properly you will see the image!
Trouble shooting: If you see the standard windows "red X" icon it means one of two things. 1) that the url is incorrect and the web browser cannot find the image or 2) that the image itself is protected from being linked to.
If you dont see a picture but you see the url being displayed, check the [img] and [/img] command tags to make sure they are correct. If everything checks out and it still wont work consult the help of the forum software you are using. Most softwares universally use "[img]" and "[/img]" as image display commands but there are a few forum softwares that use a different standard.

Give it a try! Its easy and fun. Feel free to email us if you cant get it working.
|
Posted by DallanC on Friday, December 01, 2006 (23:28:59) (26924 reads)
comments? | | Score: 5 |
| Hosting Pictures, a quick guide |
Posting pictures is very simple, if you are nervous about how to post, dont be! This guide is meant to quickly and easily explain how to post pictures from your computer, to TrophyChaser.com for free hosting. The nice thing about having your pictures hosted online, is they are available on any computer with an internet connection.
This guide is to teach new users how to get their pictures hosted on the internet. It uses the standard Categories that are already set up. If you wish to create your own album to contain your own personal pictures, please read the Create Your own Photo Albums guide.
Lets begin. First start off by locating the picture you wish to upload. Make sure its under 2048KB in size. Also make sure its largest dimention is under 2048 in size. Microsoft has a free tool to aid in resizing images if you need to reduce them for internet use. The tool is available at:
http://www.microsoft.com/windowsxp/downloads/powertoys/xppowertoys.mspx
Simply right click any image and select the resize option and wala, it magically creates a copy of the image in the selected size. Pretty spiffy. Ok assuming your image is of the proper accepted size and dimentions, lets move to the actual uploading steps.
Step 1. Click the Photo Gallery link from the Main Menu on the upper left side of the website.

Step 2. Click the Upload Picture link

Step 3. Click the Album "pulldown" list and select the proper category your picture falls under.

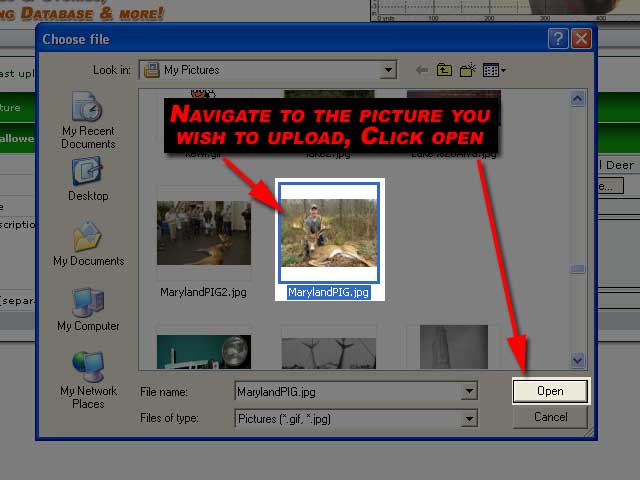
Step 4. Click the "Browse" button. This then opens a popup window allowing you to browse to the image stored on your computer.

Step 5. Browse to the image you wish to upload, click "Open"
Step 6. Enter in a Title for the image, a description if you wish, and any keywords that describe the picture (optional: these words are used if someone preforms a search for specific picture types).

Step 7. Double check the entered fields that all your information looks correct, title, description... even the image name. When it looks accurate click the "Upload Picture" button.
Step 8. Thats it! You should now see the following message if everything worked correctly. Your newly uploaded image will be approved and activated shortly by administrators. Content is only rejected if its of a pornographic or otherwise offensive nature.

Pretty simple overall. Give it a try! We'd love to see your pictures.
If you wish to create your own albums to host your own hunting pictures, see the Create Your own Photo Albums guide.
|
Posted by DallanC on Friday, December 01, 2006 (22:26:21) (22600 reads)
comments? | | Score: 5 |
| New Users Guide |
Welcome to www.HuntingNut.com!
This website is dedicated to all types of outdoorsmen, hunters, reloaders and recreational shooters.
While HuntingNut has been around since Jan of 2000, we reciently went through a major upgrade of our software January of 2005. Since then we've been able to add in tons of new and fun features for our members. As in the past, everything is completely free to registered users.
Most all of the features we offer are found on the main www.HuntingNut.com webpage either in the left side naviation block or on the right side blocks. Here is a brief overview of some features we offer here.
PointBlank Ballistics software is one of the most popular FREE ballistics packages on the internet today. We get approximately 1000 downloads of it per week. Similarly, we also have an online version available for available for registered users who may not have the PointBlank software with them, but need to do a quick calculation.
We also offer free Photo Hosting! Do you have some hunting or shooting related pictures you want to share? Or just have a secondary place to store them? Its very easy to do. New users may want to view the Photo Album Tutorial for a detailed picture guide of how to create their own online album and upload pictures into it. It is very easy and becoming very popular with people.
Our Online Reloading Database has long been a favorite of members offering lots of interesting reload information.
We also offer a unique quick link system to State Fish and Game Agencies:, links to articles and guides covering Field Dressing, Reloading, Shooting and even just humorous User submitted stories!
Last but not least, we offer online Web Forums with an extremely friendly and knowledgable user base who can answer questions, share in a joke or just chat with.
|
Posted by DallanC on Thursday, June 09, 2005 (22:23:30) (12423 reads)
comments? | | Score: 4.64 |
|
 Latest: IPutMoInYoA
 New Today: 0
 New Yesterday: 0
 Overall: 13131
 People Online:
 Members: 0
 Visitors: 83
 Total: 85
 Visitors:
 BOT:
BOT: