Coppermine Stats
Photo Albums
• Albums: 308
• Pictures: 2452 · Views: 824590 · Votes: 1316
· Comments: 86
|
| Caping Guide |
 This guide is graphic so if you find the sight of blood is disturbing, click the back button on your browser now. It is also image intensive so it might take some time to load on slower internet connections. This guide is graphic so if you find the sight of blood is disturbing, click the back button on your browser now. It is also image intensive so it might take some time to load on slower internet connections.
First off congratulations on your harvest! Getting a animal mounted is an exciting thing to me... it is much better than pictures and a great way to remember the hunt and harvest.
This guide is meant to be an overview of how to cape out a big game animal for a classic shoulder mount. It is pretty much the same for any big game animal but you might want to consult with your local taxidermist before taking to the field to see if he has any specific additional instructions.
Hint!
Before you even think about dressing out the animal and caping it, take a moment and study it in its natural form. Turn the head to the left, to the right... raise it higher and lower. Try to get a feel for the best "look" as that will aid you later when the taxidermist asks you what form you want to have it mounted on. Defects can be hidden or enhanced depending on the head position and there is no better time to figure this out than before you begin processing it in the field.
It might also be a good idea to visit a taxidermy form supplier's website to see what types of forms are available for the animal you are hunting, so you at least have an idea what is available. Common forms include Alert (head raised), sneak (head low), semi-sneak (head midlevel), and turns, Ahead, Left, Right. etc etc.
Step #1) Preparation
Try through the steps, to avoid getting blood on the cape. Some people wash off their animals which can be good or bad depending on the animal and what type of hair it has. The following pictures are of a Wyoming Pronghorn Antelope and they are notorious for having hair "slippage" so I like to touch it as little as possible and let the taxidermist do any cleaning of blood as he sees fit.
For a traditional wall mount, the cape is split right up the back of the neck and down around both sides of the chest (see red lines on following pictures).
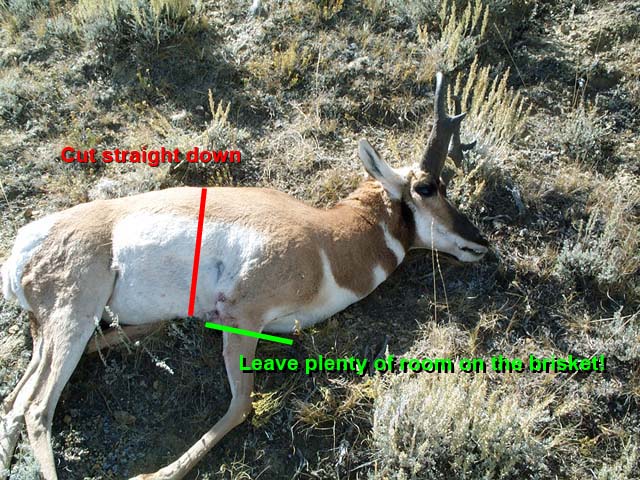
One major problem most novice hunters make is they make their chest cuts too far forward. Trust me, take more hide rather than too little. Your taxidermist will be much happier if he cuts off an extra 10" than going to mount it and finding out hes 2" short on the brisket.
Mentally envision the first cut, down the center of the animals neck:

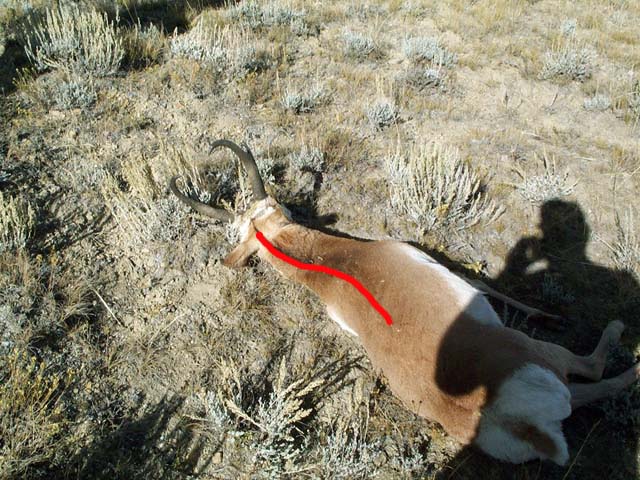
Mentally envision the side cuts, making note to start far enough back.

Step #2) Cutting down the neck
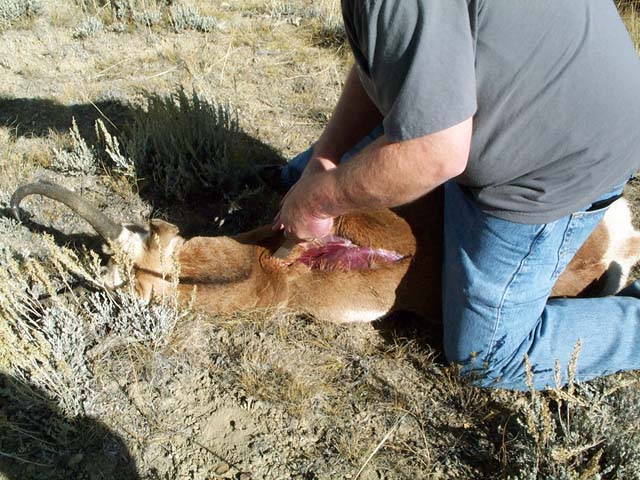
Feel with your fingers the backbone and insert your knife to make the initial hole. I dont cut too deep at this point because I want to extract the tenderloins later. I insert two fingers into the hole with my knife safely between them. I then keep constant pulling pressure on the hide as I work the knife carefully up and down making the cut. I like to angle the tip of the knife forward so the hide is cut from the inside out rather than outside edge in. This helps cutting hairs that then get all over the place.

Carefully work your way up the neck to the base of the skull.


Step #3) Cutting down the side
Again, take a good look and make sure you are starting far enough back to give your taxidermist enough hide to work with (note my brother who is a taxidermist looked at this picture and still felt i was on the edge... he'd rather the cut be another 6" back).

Cut the hide straight down the animal (be careful you dont accidently angle forward) exposing the front shoulder.

Insert the knife at the back of the front leg and cut upwards along it, angling into the "armpit" and back until you reach the previous side cut.

Next skin around the front leg, freeing it from leg and "armpit" area.


The entire front shoulder should be completely free at this point. This is a great time to remove it via the "gutless skinning method" listed in another HuntingNut article!

Step #4) Processing side 2
Turn the animal over carefully and again, double check where you are going to make the side cut.

Cut straight down the side to where the first side cut ended at the brisket, exposing the shoulder.

Insert the knife in the back of the front leg, cutting upwards towards the "armpit" then back to your side cut.

Skin around the front leg. Finish freeing up any attached hide near the belly area.


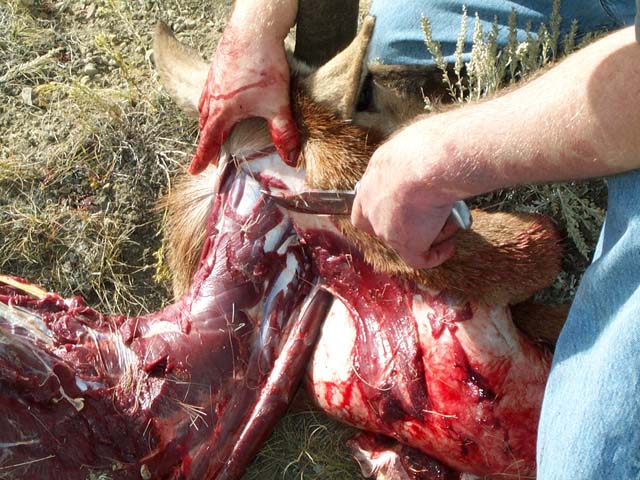
Carefully pull on the hide at this point and make small cuts freeing it from the neck and brisket area.

Once you have it free up to the base of the skull, carefully cut through the meat, jugular, windpipe and tendons at the base of the skull. Once this is done you can carefully twist off the head (it should come off with no problem).
Your head and cape should be free from the body at this point.

Spread the cape out while you process the rest of the animal to let it cool down (very important for some species of big game like Antelope)

Step #5) Processing the head
Processing the head may or may not be necessary depending on how long it will take you to get to a taxidermist. If the weather is cold or you have a way to freeze it you can do that and let the taxidermist do the skinning of the head.
I really suggest your taxidermist do this as you can really mess up cape if you cut the lips, eyes or nose wrong. Its not terribly hard however and I will walk through the steps of it. You might want to try skinning out some small game animals or even big game animals you dont intend on mounting to get a feel for how this works.
First start by orienting the head somewhere it will be secure and easy to work on. Continue the back of the neck cut
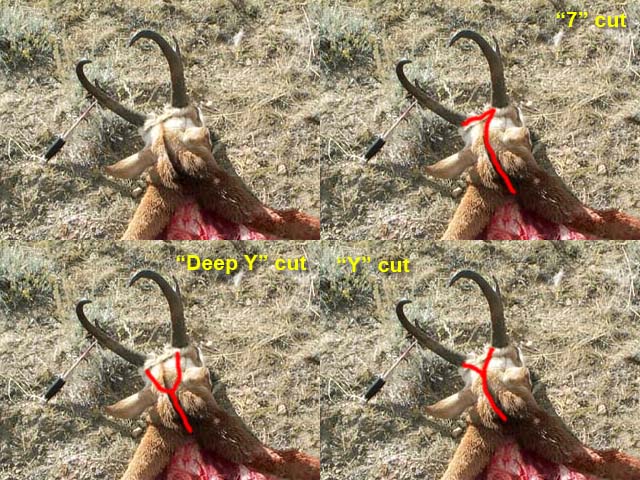
Next decide on what type of cut you want to make to free it from the antlers (for a female or animal without antlers you dont have to cut a "Y" cut but rather split the neck just enough to slip the cape up over the head). There are several variations on this and I suggest you ask your taxidermist what he recommends. I personally like the "deep y" as it tends to hide the stitching in the folds of the ears. I have an antelope mounted with a normal "Y" and you can see the stitching on the top of the head. Ask your taxidermist what he recommends.
Next begin carefully skinning the cape from the head. Wiggle the ears to get an idea of where the cartlidge connects to the skull. Cut through it as close to the skull as possible.
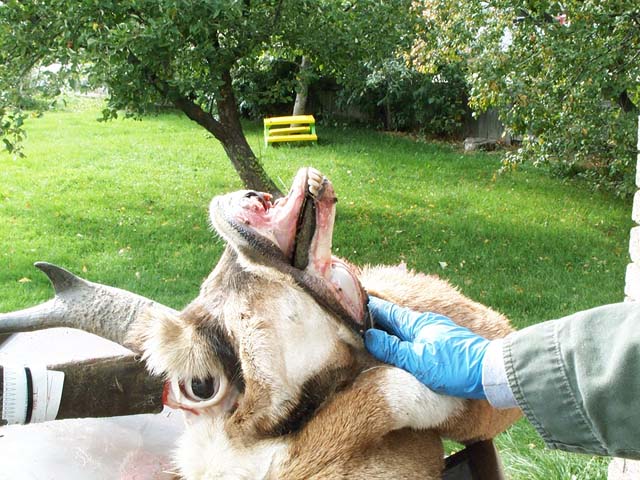
NOTE: this is a poor picture but the head is upside down resting on its horns and nose. You can see on the left side where the ear cartlidge has been cut free.

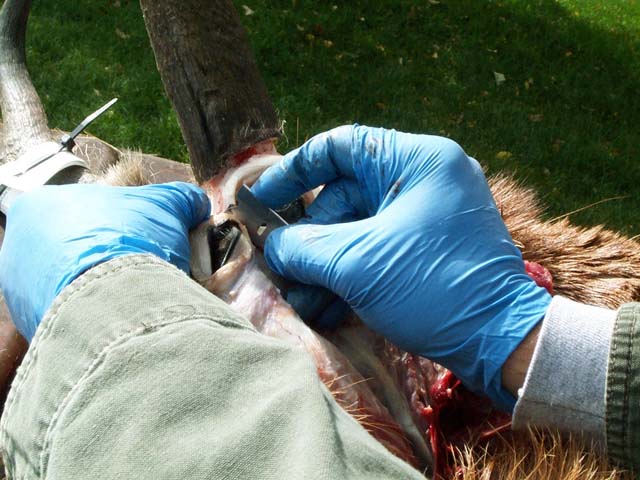
Carefully cut around the base of each antler / horn, freeing the hide. Work in slow careful strokes until you come to the eyes.

Ok if you are tired at this point take a break. The eyes are next and can be tricky for your first time. Now is when patience pays off. Pull on the eye lids and feel with your fingers where the skin around the eye attaches to the skull. You want to cut this as close as possible to the skull. It should be nearly pure white skin that you are cutting. You should be able to see your knife blade behind the skin if you look down under the eyeball. Verify several times you arent cutting any visible "outside" skin. This is expecially important when you get to the inside corner of the eye where the tear duct is. Cut deeply into the skull to remove as much of the duct as possible.
Cut deep, inside the eye socket bone, freeing as much tissue as you can. Your taxidermist will cut off anything he doesnt need but like with a brisket if you are short here, it will be difficult for him to fix.


Once that tedious step is done, orient the animal so you can begin freeing up the lips. Pull the lower lip with a steady pressure and cut it free from the inside of the lip where it meets the gums.

Next pull upward on the upper lip and cut through the gum material and upwards through the nose. It should slowly unfold as you work it free.
Once you have freed the lips and nose, re-orient the head and finish skinning down the sides of the cheeks until it comes free.

At this point your cape should be off the head. Carefully cut off any large pieces of meat that might be hanging on to it. If you have immediate access to a freezer roll it up carefully and freeze it. If you dont have access to a freezer put it in a cool shady spot and unroll it so it can begin to air dry. Rub salt onto it to aid in the drying process.
DO NOT SALT AND THEN FREEZE THE HIDE!!! THIS WILL FREEZER BURN IT RUINING MOST HIDES!!! Freeze *OR* salt but not both!

With the cape removed you can now saw the antlers off or if you are going for a european mount you can boil the head right now (antelope need their horn sheaths removed first, email me if you need instructions on ways to do that step).

Thats pretty much it! Take it to your taxidermist and get it mounted then come back here and share some pictures! |
Posted by DallanC on Saturday, March 25, 2006 (02:41:09) (24332 reads) [ Administration ]
|
|
Article Rating
Average Score: 4.72Votes: 18 Please take a second and vote for this article:
|
 Latest: IPutMoInYoA
 New Today: 0
 New Yesterday: 0
 Overall: 13131
 People Online:
 Members: 1
 Visitors: 203
 Total: 205
 Members:
 Visitors:
 BOT:
BOT:
